Spaghetti Squash Marinara


Spaghetti Squash Marinara

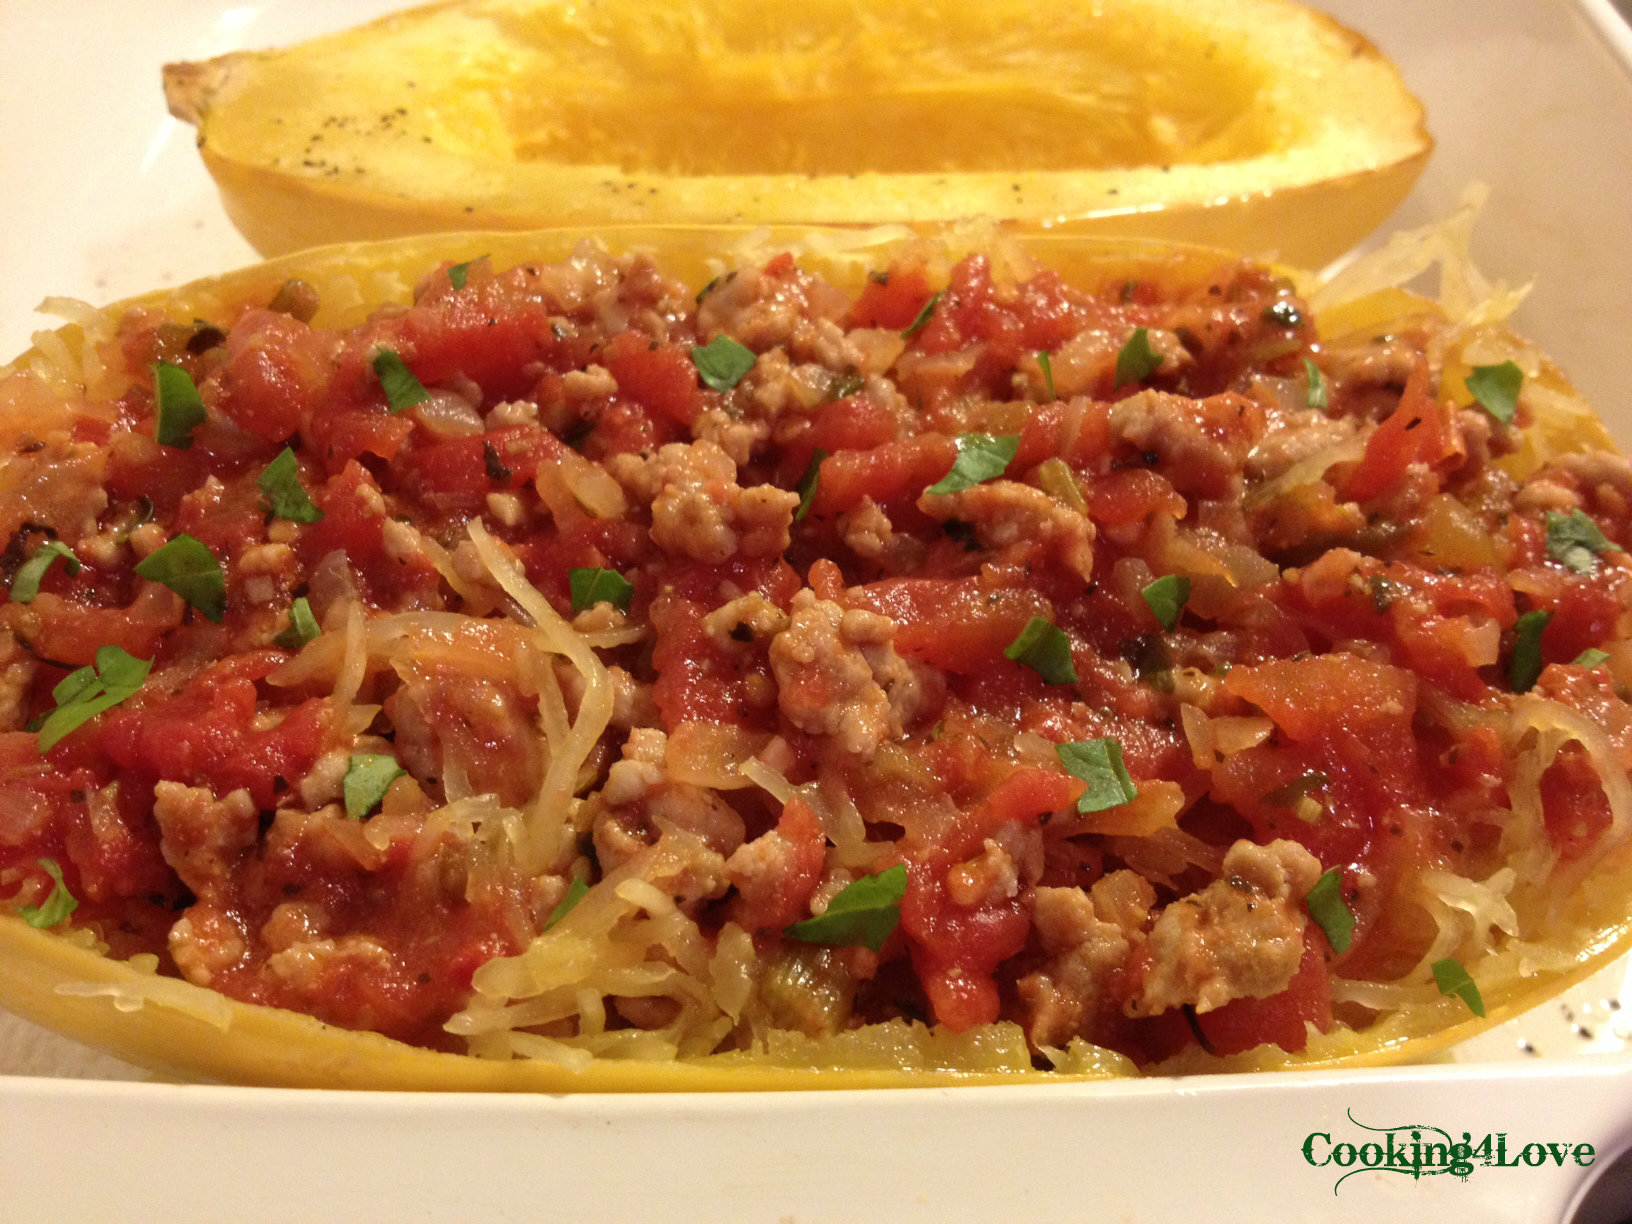
Lately, I’ve been seeing a lot of recipes being shared on Facebook, most of which are healthy and look really delicious. I try to make a point of “liking” or sharing the post so I can go back to it, or I simply copy it down. Last week, one of my friends shared one for spaghetti squash, and sadly, I didn’t do either and don’t recall which friend it was. I figured I could wing it, but looked up a few recipes to find out about cooking times in both the oven and microwave. I ended up cooking mine in the oven, mostly because my microwave is small and cooking a whole spaghetti squash in there can lead to spaghetti squash wallpaper if it explodes. Needless to say, the end result was incredible, and honestly, tasted better than I expected. If you like healthy, and/or love pasta, but hate the carbs, look no further!  If you’re short on time or just want to simplify this recipe , you can use your favorite spaghetti or marinara sauce instead of making this one, but I recommend you trying mine out 🙂 I added lean ground Italian turkey to mine; however, if you’re a vegetarian or vegan, obviously you can omit it. Feel free to add some veggies, too, if you so desire.

*UPDATE* –  shortly after posting this, I stumbled across a spaghetti squash recipe that looked amazing, so I quickly took the remaining half squash from this recipe and added the two additional ingredients, which I’ll post at the bottom (with a photo, of course)!

Ingredients

  • 1 medium uncooked spaghetti squash, about 2 lbs.
  • 1 (14.5 oz.) can stewed tomatoes, chopped
  • 1 (14.5 oz.) can whole Roma tomatoes, chopped (discard juice)
  • 1/2 lb. lean ground Italian turkey meat (I used Jennie O), optional
  • 1 tbsp. extra virgin olive oil plus extra for baking dish
  • 1 cup onion, finely chopped
  • 1-2 tsp. garlic, minced
  • 1 tsp. fennel seeds, ground in spice mill or using mortar & pestle
  • 1 tsp. Italian seasoning
  • 2 tbsp. fresh basil, chopped
  • Salt and pepper, to taste and for sprinkling baking dish
  • Parmesan cheese, go big and just use a little for the top

Cooked Squash

Directions

  1. Preheat oven to 375°F.
  2. Cut squash in half lengthwise using a sharp knife. This can be somewhat difficult, so be careful. If need be, start at one end, cutting half way through then turn it around and cut through the other half. Once the squash is cut in half, scoop out the seeds.
  3. Drizzle a little olive oil in a large baking dish, then sprinkle with some salt & pepper. Place squash cut sides down in dish and prick skin with a fork all over.
  4. Cook for 45 minutes.
  5. While the squash is cooking,  heat oil in a medium skillet over medium heat. Add onion, garlic and crushed fennel, and sauté until tender, about 5 minutes.
  6. Add ground turkey, and continue to sauté until cooked through, breaking into small pieces, about 10 minutes.
  7. Stir in tomatoes (including juice from the can of stewed tomatoes), basil and Italian seasoning; bring to a boil. Reduce heat and simmer, uncovered, stirring often, 5 minutes or until desired consistency.
  8. Remove squash from oven and carefully turn over with an oven mit (they’ll be hot!). Rake the stringy squash pulp from the skin with a fork, separating it into strands that look like spaghetti. You can either serve the squash in its skin or move the strands to a plate.
  9. Spoon sauce over squash and sprinkle with Parmesan cheese.

Yummy!

Additional Recipe: Cheesy Spaghetti Squash with Marinara

Cheesy Spaghetti Squash

The additional items you’ll need are 1 cup of cottage cheese (I prefer low fat) and 1 cup of shredded cheese. I used a light Mexican four-blend, but the recipe I saw calls for Mozzarella. To make this, after cooking the squash and scraping the strings with a fork, add 1/2 cup cottage cheese to each half, top with marinara, and then add 1/2 cup cheese to each one. Put on a baking sheet and place under the broiler for approximately 3-5 minutes. I added some fresh chopped oregano and basil, and as you can see, some of it burned, so I ended up finishing it in the microwave until the cheese got melted and bubbly.

Top ↑

Advertisement

Fresh Corn OFF The Cob


Fresh Corn

Believe it or not, I’ve never stripped corn to get fresh kernels… until today. I came across a recipe for linguine with fresh vegetables, which included corn, and although it looked delicious, I’ve been veering away from pasta as of late. So, I thought I’d make the corn and either eat it solo or add it to a salad. This is a quick and easy recipe, which yields super yummy corn!

Ingredients

  • 1 ear of corn, kernels removed
  • 1 small garlic clove, minced
  • 1 tbsp. extra virgin olive oil
  • 1/8 tsp. salt
  • 1/8 tsp. freshly ground black pepper

Directions

  1. Remove the leaves and “silk” from the ear of corn, then chop off the pointed top and stalk. Use a sharp knife to shave off the kernels — either stand ear upright on its base and shave downward, or lay on its side on a cutting board to slice off the kernels.
  2. Heat the oil in a medium skillet over medium heat.
  3. Add corn, garlic and salt and pepper to pan.
  4. Cook, stirring occasionally, for approximately 3-5 minutes until tender.
  5. Serve hot or cold.

Top ↑

Avocado-Lime Sauce


Avocado Lime Sauce

I’ve said it before, but in case you missed it… I LOVE sauces, and think they can take a dish to the next level. I made some baked fish last night (which was amazing, and will post soon), and knew I wanted some type of sauce to accompany/compliment it, so put on my creative thinking cap. I’ve been on a big avocado kick lately, and my fish recipe included lime juice, so I figured I’d whip up a sauce which included both, but also wanted it to be healthy. Thus, I used greek yogurt instead of mayo! The results were fantastic and added that little extra something to my dinner. This would be great on chicken, grilled steak, pork, fish and tacos.

Since I made this just for moi, I used half of an avocado, which still yielded enough for a few servings, but if you’re feeding four or more, I’d double the recipe.

Ingredients

  • Half medium avocado, mashed
  • 2 tbsp. lime juice
  • 2 tbsp. nonfat Greek yogurt
  • 1 tbsp. cilantro, finely chopped
  • 1 small garlic clove, minced
  • 1/8 tsp. cayenne pepper
  • Salt to taste

Directions

  1. Mash avocado well with fork in a small bowl.
  2. Add remaining ingredients, mix well and chill covered in fridge until ready to use.
  3. Garnish with cilantro, if desired.

Top ↑

Beer-Battered Fish Tacos With Chipolte Sauce and Salsa


Image

I receive numerous emails containing recipes, and got one yesterday from Kitchen Daily for this recipe, which originally came from Eating Well. As always, I modified it and came up with the chipolte white sauce to accompany the tacos. I like this because it’s not deep-fried and is really yummy. Now, don’t get me wrong, I love me some deep-fried food, but prefer to eat healthier… most of the time 😉

If you want to skip the sauce and make this even lighter, you can top the tacos off with a little plain greek yogurt with the salsa.

Ingredients

Fish Tacos

  • 3 tbsp. all-purpose flour
  • 1/8 tsp. ground cumin
  • 1/4 tsp. garlic powder
  • 1/4 tsp. cayenne pepper, or more for additional heat
  • 1/8 tsp. salt
  • 1/3 cup beer
  • 8 oz. tilapia filet, cut crosswise into 1-inch wide strips
  • 1 tbsp. canola oil
  • 4 corn tortillas, warmed
  • 1 cup shredded cabbage
  • Fresh salsa

Chipolte Sauce

  • 1/4 cup light mayo
  • 1 tbsp. low-fat milk
  • 2 tbsp. lime juice
  • 1/4 tsp. garlic salt
  • 1/4 tsp. chipolte seasoning

Directions

Chipolte Sauce

  1. Mix all of the ingredients together and put in fridge while preparing the fish.

Fish Tacos

  1. Combine flour, cumin, garlic, salt and cayenne in a medium bowl. Whisk in beer to create a batter.
  2. Coat tilapia pieces in the batter.
  3. Heat oil in a large nonstick skillet over medium-high heat.
  4. Add the fish to the pan, letting excess batter drip back into the bowl.
  5. Cook until crispy and golden, 2 to 4 minutes per side.
  6. Serve fish with tortillas, cabbage, chipolte sauce and salsa.
With guacamole on a flour tortilla

Top ↑

Sautéed Kale


I realize this recipe may not be as exciting as some of my others, but knowing that it is a superfood, should entice you to try it (if you already haven’t). The skinny on this leafy green is that Kale, also known as borecole, is one of the healthiest vegetables on the planet. It’s available in curly, ornamental, or dinosaur varieties. It belongs to the Brassica family that includes cruciferous vegetables such as cabbage, collards, broccoli, and Brussels sprouts. One cup of kale contains 36 calories, 5 grams of fiber, and 15% of the daily requirement of calcium and vitamin B6, 40% of magnesium, 180% of vitamin A, 200% of vitamin C, and 1,020% of vitamin K. It is also a good source of minerals copper, potassium, iron, manganese, and phosphorus. So… with all that being said, eat your Kale!

This recipe is super easy to prepare and adds some really nice flavor.

Sauteed Kale

Ingredients

  • 1 1/2 lbs. kale, stems removed and leaves coarsely chopped
  • 2 tbsp. olive oil
  • 1/4 tsp. crushed red pepper flakes (optional)
  • 2 garlic cloves, minced
  • 1/2 cup vegetable or chicken stock (can use 1/2 cup water if desired)
  • Salt and pepper, to taste
  • 2 tsp. red wine vinegar (can substitute balsamic)

Directions

  1. Heat olive oil in a large saucepan over medium-high heat.
  2. Add crushed red pepper flakes, if using, and let them sizzle a bit in the oil.
  3. Add the garlic and cook until soft, but not colored.
  4. Add the stock and kale, and toss to combine.
  5. Cover and cook for 5 minutes.
  6. Remove cover and continue to cook, stirring until all (most) of the liquid has evaporated.
  7. Season with salt and pepper and add vinegar.

Top ↑

Steak (or Chicken) Fajitas


I’m a huge fan of Mexican food, and can eat a boatload of chips and salsa. However, my true love really lies with tacos and fajitas. Here’s a quick & delicious recipe which I made last week that is sure to please. This would be equally as tasty as a vegetarian dish by omitting the meat and substituting black beans.

Delicious Steak Fajitas

Ingredients

  • 3/4 lb top sirloin steak
  • 1 onion, cut lengthwise & cut into strips
  • 2 small sweet peppers of your choice (green, red, or yellow), cut into strips
  • 4 tbsp. olive oil
  • 2 tbsp. lime juice
  • 2 garlic cloves, minced
  • 1 tsp. chili powder
  • 1 tsp. cumin
  • 1/4 tsp. hot pepper flakes
  • 1 tsp. black pepper
  • 1 tsp. salt
  • 8 flour tortillas

Steak Fajitas In The Pan

Directions

  1. Slice steak into thin strips.
  2. In bowl, mix together 2 tablespoons olive oil, lime juice, garlic, chili powder, cumin, hot pepper flakes, black pepper & salt.
  3. Add beef strips and stir to coat, set aside.
  4. Wrap tortillas in foil and place in 350° oven for 5-10 minutes or until heated through.
  5. In large nonstick skillet over medium high heat, heat remaining tablespoons of olive oil.
  6. Add onions & peppers stirring for 3-4 minutes, until softened; transfer to a bowl and set aside.
  7. Add beef to skillet, cook, stirring for 3-4 minutes or until they lose their red color.
  8. Return onions and peppers to skillet; stir for about one minute.
  9. To serve, spoon a portion of the beef mixture down the center of each tortilla, top with your desired toppings (salsa, shredded cheese, guacamole, sour cream, etc.), fold bottom of tortilla up over filling, and fold the sides in, overlapping.

Top ↑

Slow Cooker Hoppin’ John


If you’re not familiar with Hoppin’ John, it is a dish served in the Southern United States consisting of black-eyed peas (or field peas) and rice, with chopped onion and sliced bacon, seasoned with a bit of salt. Some people substitute ham hock, or country sausage for the conventional bacon; a few use green peppers or vinegar and spices. In the southern United States, eating Hoppin’ John on New Year’s Day is thought to bring a prosperous year filled with luck. The peas are symbolic of pennies or coins, and a coin is sometimes added to the pot or left under the dinner bowls. Collard greens, mustard greens, turnip greens, chard, kale, cabbage etc. along with this dish, are supposed to also add to the wealth since they are the color of money. Another traditional food, cornbread, can also be served to represent wealth, being the color of gold. On the day after New Year’s Day, leftover “Hoppin’ John” is called “Skippin’ Jenny,” and further demonstrates one’s frugality, bringing a hope for an even better chance of prosperity in the New Year.

I made this yummy dish last year, and thought for sure I has posted it right afterwards, but my bad for not doing so. This recipe contains bacon, so if you’d like to make it vegetarian,  simply omit that and substitute vegetable broth for the chicken stock. This can be served as a stew or you can use a slotted spoon to drain it. Some people like to have the “sauce” on the side to dip their cornbread in.

Hoppin' John

Ingredients

  • 1 1/2 cups Black Eyed Peas
  • 4 oz. bacon, cooked & chopped
  • 1 orange or yellow bell pepper, diced
  • 1 medium onion, diced
  • 2 celery stalks, finely diced
  • 1 bunch of carrots, diced
  • 3 garlic cloves, minced
  • 1 jalapeño pepper, cut in half lengthwise
  • 32 ounces low-sodium chicken stock/broth
  • 3 bay leaves
  • 2 tsp. Old Bay Seasoning
  • 1 sprig fresh Thyme
  • Salt and black pepper, to taste
  • 1 bunch Collard greens, leaves stripped from stem

Directions

  1. Rinse the peas under cold water and pick out any stones or discolored peas. Bring the peas to boil in a medium saucepan full of cold water. Boil the peas for 10 minutes. As the beans cool, start chopping the vegetables. If you are planning to simmer the stew all day, skip boiling the peas.
  2. Cook bacon in a skillet or the microwave, set aside.
  3. Combine peas, diced bell pepper, onion, carrots, garlic, jalapeño halves, stock and seasonings in a slow cooker. Cook for at least 4 hours on low.
  4. About an hour before you are ready to serve, prepare the collards by cutting the leaves into strips and add them to the stew.
  5. Add the reserved cooked bacon at this time. Cook the stew for another 40-60 minutes.
  6. Remove the bay leaves, thyme stems, and jalapeno halves.
  7. Serve alone or over of your favorite rice. If desired, can top with cheddar cheese, scallions and a drizzle of white vinegar.

Top ↑

Cornish Game Hens


I decided to go a little non-traditional this Thanksgiving, and make cornish hens instead of turkey. I’ve never made them before, and am so glad I did… they were truly incredible. Seriously. I combined two recipes, one was for a turkey breast, and have to say, it’s a brilliant combo. I will tell you there are a lot of ingredients, but don’t shy away because of that… there’s a rub for the bird, in addition to what’s put in the cavity, so it’s really pretty straight forward. I’m giving you the recipe to make two hens, so if you just want to make one, simply divide everything in half.

Cornish Game Hens

Ingredients

For The Cavity

  • 4 cloves garlic (2 for each hen) + 8 additional cloves garlic for arranging around hens
  • 2 cinnamon sticks (1 per hen)
  • 1 small onion, cut in half (1/2 onion per hen)
  • 4 lemon wedges (2 per hen)
  • 2 sprigs rosemary (1 per hen)

Herb Rub Mix

  • 1/4 cup olive oil
  • 2 cloves garlic, minced
  • Zest of 1 lemon
  • 2 tbsp. fresh rosemary, finely chopped
  • 2 tbsp. fresh sage, finely chopped
  • 2 tbsp. fresh thyme, finely chopped
  • 2 tbsp. fresh parsley, finely chopped
  • 1 tsp. chili powder

For Basting

  • 1/3 cup white wine
  • 1/3 cup chicken broth
  • 2 tbsp. olive oil

Directions

  1. Preheat oven to 450 degrees F.
  2. Season hens with salt and pepper.
  3. Stuff hens with cavity ingredients.
  4. Generously rub herb mix all over hens and underneath skin.
  5. Arrange 8 garlic cloves around hens in small roasting pan (you don’t need a rack).
  6. Add some chicken broth to pan. I didn’t measure but made sure the bottom of pan was covered.
  7. Roast in oven for 25 minutes.
  8. Combine wine, chicken broth and olive oil in a bowl.
  9. Reduce temperature to 350 degrees F. and pour basting liquid over hens.
  10. Baste every 10 minutes, and continue roasting for 25 minutes longer, or until hens are golden brown and juices run clear.

* To make a gravy/sauce, transfer pan juices and garlic cloves to a saucepan, and boil until liquid reduces to a sauce consistency, about 8 minutes. 

Top ↑

Cheddar Bay Biscuits


I made these a while back, and remembered how tasty they were so decided to make them again. Apparently, they’re very similar to those served at Red Lobster, but I haven’t eaten there in years so can’t compare. However, I just informed by a friend, that there’s a Red Lobster very close to me… which I drive by everyday to and from work. Pretty funny that I didn’t remember that. But, now that I know, I will definitely be popping in to check out their infamous biscuits. Anywho, if you like garlic, cheddar & biscuits, then you’ll surely enjoy these.

Ingredients

Biscuits:

  • 1 1/4 cups Bisquick
  • 2 tbsp. cold butter
  • 1/2 cup cheddar cheese, shredded
  • Little less than 1/2 cup milk
  • 1/8 tsp. garlic powder
  • 1/8 tsp. Old Bay seasoning

Butter Glaze:

  • 1 1/2 tbsp. butter
  • 1/4 tsp. garlic powder
  • 1/2 tsp. dried parsley flakes

Directions

  1. Preheat oven to 400 degrees. Lightly grease or line one cookie sheet with parchment; set aside.
  2. Combine Bisquick with cold butter in a medium bowl using a pastry cutter (or use 2 forks). Don’t worry about mixing too thoroughly; there will be small chunks of butter in the mix about the size of peas.
  3. Add cheddar cheese, milk, garlic powder, and Old Bay.
  4. Mix by hand until combined, but don’t over mix.
  5. Drop 1/4 cup portions of the dough onto cookie sheet.
  6. Bake for 11-13 minutes in preheated oven or until the tops of the biscuits begin to turn light brown.
  7. While the biscuits are baking, melt butter is a small bowl in the microwave.
  8. Stir in garlic powder and dried parsley flakes.
  9. Use a brush to spread the garlic butter over the tops of all the biscuits.

This recipe makes about 6 biscuits. Double the ingredients if you want more. 

Top ↑

A Modified Version of Shrimp and Grits


As you may, or may not know, I looooooooove shrimp and grits! While my earlier recipe on here is one of my all-time favorites, this one is simply delicious. I was watching The Chew on Friday, and Carla Hall made a dish called “Swamp Thing”, which was her healthier version of shrimp and grits. Once I saw it was loaded with vegetables, I was sold, and knew I had to try it, which I did later that day with a few small modifications. This recipe does take a little effort, as the grits need to be made about an hour beforehand, and there’s a decent amount of veggie chopping, but trust me when I say, it’s worth it! Thanks Carla!!!

Ingredients

Grits:

  • 1 cup Quick Grits
  • 1 1/2 cups water
  • 1 cup Half & Half (or milk)
  • 1/2 cup fresh or frozen corn
  • 1/2 cup cheddar cheese (optional)
  • salt & pepper to taste
  • 4 tbsp. butter
  • Olive oil (for frying grits)

Shrimp Stew

  • 1/2 pound shrimp (peeled and deveined)
  • 3 cloves garlic (thinly sliced)
  • 1/2 onion (medium diced)
  • 1 large carrot (medium diced)
  • 1/4 cup corn
  • Half of a 14.5-ounce can whole plum tomatoes (crushed)
  • 2 cups collard greens (ribboned*)
  • 1 cup sweet potatoes (peeled and diced, or canned)
  • 1/4 tsp. cayenne pepper
  • 1/2 parsnip (peeled and diced)
  • 1 bay leaf
  • 2 tsp. fresh thyme
  • 2 tbsp. flour
  • 1 quart (4 cups) chicken stock/broth
  • 2 tbsp. olive oil plus more for pan
  • salt and pepper to taste

Directions

Grits

  1. In a medium saucepan, bring water, Half & Half, and corn to a boil.
  2. Slowly whisk in grits, avoiding lumps and cook according to package directions.
  3. Once cooked, whisk in butter and cheese (if using).
  4. Pour into greased baking dish, allow to cool, then place in refrigerator for an hour.
  5. At this point, you can start on the stew if you want & come back to step 6.
  6. Remove grits from fridge and cut into 3 inch squares (or desired size).
  7. Heat a non-stick pan over medium-high heat with olive oil.  Fry grits in hot oil until golden on all sides. Remove from pan.

Shrimp Stew

  1. In a heavy bottomed pot, over high heat, add olive oil. Toss in the onions and garlic and cook for about 3 minutes.
  2. Toss in all the other vegetables except for the collard greens and crushed tomatoes, and add olive oil if it seems dry. Coat all the vegetables in oil and continue to cook over high heat, just slightly browning everything.
  3. Sprinkle flour over the vegetables and stir. Deglaze with the chicken stock. Add the collard greens, thyme, bay leaf and cayenne, and stir.
  4. Add in the tomatoes and bring to a boil.
  5. Reduce to a simmer and cook until the vegetables are cooked through, about 25 minutes.
  6. Right before serving, toss in the shrimp and simmer for 2-3 minutes, or until the shrimp is just cooked through.
  7. Plate in a soup bowl on top of fried grits.  Season to taste.  Serve immediately.

* To ribbon the collard greens, take some leaves, place them on top of each other, roll them up long-way, and cut small pieces off of the ends. This will form long, thin pieces known as ribbons.

Note: If you don’t do shrimp/shellfish, you can definitely leave it out. Also, feel free to substitute vegetable broth in place of chicken broth. 

Top ↑