Sweet and Spicy Baked Chicken Wings


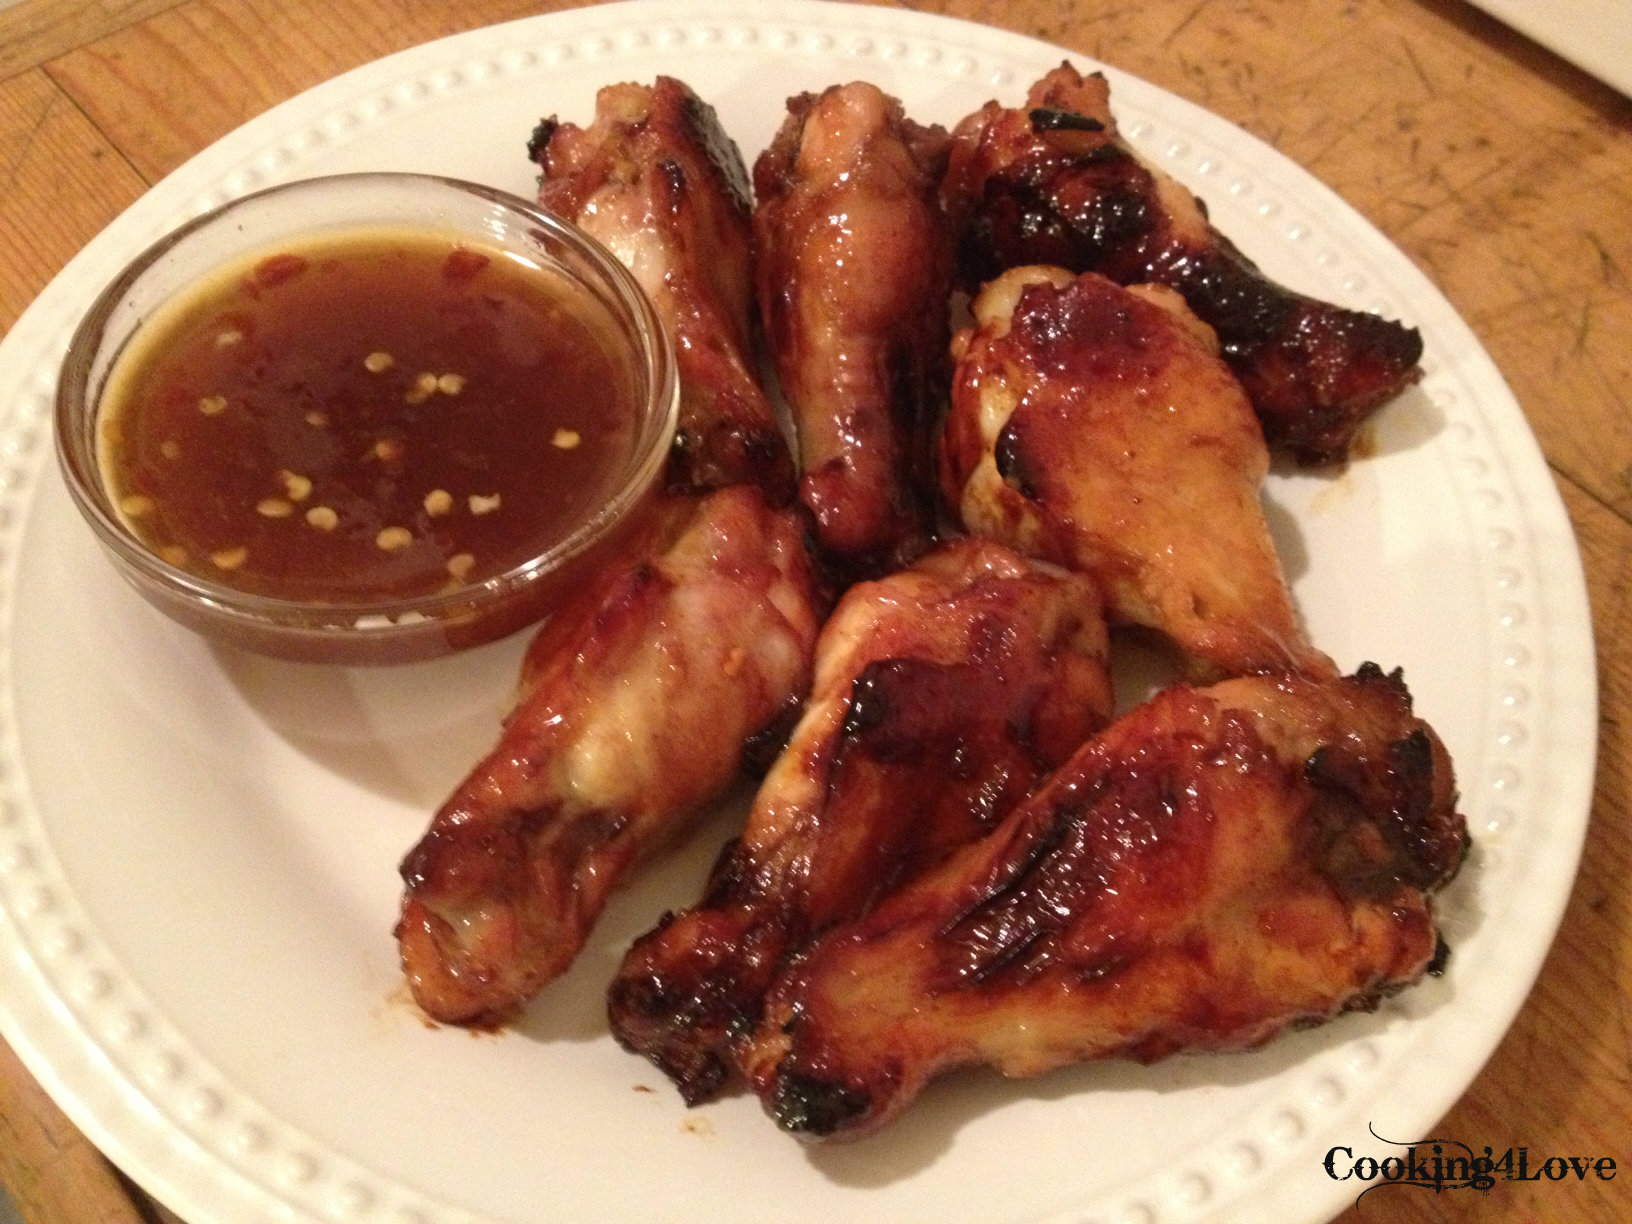
On a recent episode of The Chew, Daphne Oz and Mario Batali had a chicken wing cook-off, and after seeing Daphne’s ingredients (and that hers were baked), I had to try them right away. Needless to say, they did not disappoint. I love the fact that the marinade on these babies caramelize while baking, which makes them a bit crispy. Oh, and the dipping sauce… yummy!!! Since I’m a huge fan of anything sweet, the sauce was perfect for me, but if you’d like it with a little more twang, reduce the half cup of honey by a couple of tablespoons (1/2 cup = 8 tablespoons).

Sweet and Spicy Wings

Ingredients

For the Wings:

  • 2 dozen chicken drumettes
  • 1/2 cup olive oil
  • 1/4 cup rice vinegar
  • 1 tsp. crushed red pepper
  • 1/2 cup honey
  • 2 tbsp. low sodium soy sauce
  • 1/2 tsp. chili powder
  • 1 tsp. Dijon mustard
  • 2 garlic cloves (minced)
  • Salt and pepper to taste

For the Dipping Sauce:

  • 1 tbsp. sambal chili paste
  • 1/2 cup Honey
  • 2 tbsp. low sodium soy sauce
  • 1 tbsp. Dijon mustard
  • 1 tsp. grated ginger

Directions

  1. Combine all the ingredients for the drumettes in a bowl and toss the wings to coat.
  2. Place in the refrigerator and marinate a minimum of two hours and preferably over night.
  3. Preheat oven to 425 degrees. Remove drumettes from the marinade and season with salt and pepper.
  4. Spray a baking sheet with cooking spray and arrange the drumettes so they are not touching. Brush generously with the leftover marinade.
  5. Bake in the oven for about 40 minutes, or until deep golden brown, rotating the tray half way through and flipping the wings over.
  6. While chicken is baking, combine all of the dipping ingredients and whisk together.
  7. Serve the drumettes with the dipping sauce.
Shown with my guiltless blue cheese dressing.

 Top ↑

Unsloppy Joes


I saw a commercial a few days ago for Pillsbury Grands Biscuits and this recipe, and knew I had to try it since Sloppy Joes were a staple when I was growing up (thanks Mom!). I still love them, but nowadays, I make them from scratch… most of the time. If I’m pinched for time, or simply being lazy (it happens), then I turn to my trusted Manwich Sloppy Joe sauce. With that being said, this old-school recipe taken to a new level, uses the canned sauce so it can prepared in a flash, which makes it perfect for a weeknight or when time is of the essence.

Make sure to scroll to the bottom for an additional way to make these 🙂

Unsloppy Joes

Ingredients

  • 1 lb. lean ground beef, cooked, drained
  • 1 can (15 oz) Manwich sloppy joe sauce
  • 1 tsp. chili powder
  • 1 can (16.3 oz) Pillsbury® Grands!® refrigerated biscuits
  • 1/2 cup shredded cheddar cheese (2 oz)

Directions

  1. Heat oven to 375° F.
  2. In large skillet, cook ground beef over medium-high heat until beef is thoroughly cooked, stirring frequently; drain.
  3. Stir in sauce and chili powder; simmer 5 minutes.
  4. Cut biscuit in half and press bottom into 6-inch round.
  5. Spoon 1/3 cup meat mixture and about 1 tbsp. cheese onto center of each round.
  6. Take top half of biscuit and press it out so it’s approximately the same size as the bottom, and place over filling; press sides to seal. Place on ungreased cookie sheet.
  7. Bake 9 to 14 minutes or until golden brown.

* If you want it saucier, use only 3/4 lb. beef. To add a little heat, if you so desire, add a skosh of cayenne pepper to the sauce. Also, feel free to add a bit of onion and/or garlic powder while cooking the beef. 

Another idea, which I think is really cute & just came up with, is making this a muffin. Simply cut the biscuit in half, spread the dough out enough so when you put it in the muffin tin, the sides go up to the top, then fill with sloppy joe and top with some cheese.

Sloppy Joe Muffin


If you have any leftover Sloppy Joe, put it into muffin cups, stick the pan in the freezer until frozen, remove from pan, place into a ziplock bag & return to freezer. Each frozen sloppy joe “muffin” should be equivalent to a single serving when defrosted and reheated.

Top ↑

Steak (or Chicken) Fajitas


I’m a huge fan of Mexican food, and can eat a boatload of chips and salsa. However, my true love really lies with tacos and fajitas. Here’s a quick & delicious recipe which I made last week that is sure to please. This would be equally as tasty as a vegetarian dish by omitting the meat and substituting black beans.

Delicious Steak Fajitas

Ingredients

  • 3/4 lb top sirloin steak
  • 1 onion, cut lengthwise & cut into strips
  • 2 small sweet peppers of your choice (green, red, or yellow), cut into strips
  • 4 tbsp. olive oil
  • 2 tbsp. lime juice
  • 2 garlic cloves, minced
  • 1 tsp. chili powder
  • 1 tsp. cumin
  • 1/4 tsp. hot pepper flakes
  • 1 tsp. black pepper
  • 1 tsp. salt
  • 8 flour tortillas

Steak Fajitas In The Pan

Directions

  1. Slice steak into thin strips.
  2. In bowl, mix together 2 tablespoons olive oil, lime juice, garlic, chili powder, cumin, hot pepper flakes, black pepper & salt.
  3. Add beef strips and stir to coat, set aside.
  4. Wrap tortillas in foil and place in 350° oven for 5-10 minutes or until heated through.
  5. In large nonstick skillet over medium high heat, heat remaining tablespoons of olive oil.
  6. Add onions & peppers stirring for 3-4 minutes, until softened; transfer to a bowl and set aside.
  7. Add beef to skillet, cook, stirring for 3-4 minutes or until they lose their red color.
  8. Return onions and peppers to skillet; stir for about one minute.
  9. To serve, spoon a portion of the beef mixture down the center of each tortilla, top with your desired toppings (salsa, shredded cheese, guacamole, sour cream, etc.), fold bottom of tortilla up over filling, and fold the sides in, overlapping.

Top ↑

Slow Cooker Hoppin’ John


If you’re not familiar with Hoppin’ John, it is a dish served in the Southern United States consisting of black-eyed peas (or field peas) and rice, with chopped onion and sliced bacon, seasoned with a bit of salt. Some people substitute ham hock, or country sausage for the conventional bacon; a few use green peppers or vinegar and spices. In the southern United States, eating Hoppin’ John on New Year’s Day is thought to bring a prosperous year filled with luck. The peas are symbolic of pennies or coins, and a coin is sometimes added to the pot or left under the dinner bowls. Collard greens, mustard greens, turnip greens, chard, kale, cabbage etc. along with this dish, are supposed to also add to the wealth since they are the color of money. Another traditional food, cornbread, can also be served to represent wealth, being the color of gold. On the day after New Year’s Day, leftover “Hoppin’ John” is called “Skippin’ Jenny,” and further demonstrates one’s frugality, bringing a hope for an even better chance of prosperity in the New Year.

I made this yummy dish last year, and thought for sure I has posted it right afterwards, but my bad for not doing so. This recipe contains bacon, so if you’d like to make it vegetarian,  simply omit that and substitute vegetable broth for the chicken stock. This can be served as a stew or you can use a slotted spoon to drain it. Some people like to have the “sauce” on the side to dip their cornbread in.

Hoppin' John

Ingredients

  • 1 1/2 cups Black Eyed Peas
  • 4 oz. bacon, cooked & chopped
  • 1 orange or yellow bell pepper, diced
  • 1 medium onion, diced
  • 2 celery stalks, finely diced
  • 1 bunch of carrots, diced
  • 3 garlic cloves, minced
  • 1 jalapeño pepper, cut in half lengthwise
  • 32 ounces low-sodium chicken stock/broth
  • 3 bay leaves
  • 2 tsp. Old Bay Seasoning
  • 1 sprig fresh Thyme
  • Salt and black pepper, to taste
  • 1 bunch Collard greens, leaves stripped from stem

Directions

  1. Rinse the peas under cold water and pick out any stones or discolored peas. Bring the peas to boil in a medium saucepan full of cold water. Boil the peas for 10 minutes. As the beans cool, start chopping the vegetables. If you are planning to simmer the stew all day, skip boiling the peas.
  2. Cook bacon in a skillet or the microwave, set aside.
  3. Combine peas, diced bell pepper, onion, carrots, garlic, jalapeño halves, stock and seasonings in a slow cooker. Cook for at least 4 hours on low.
  4. About an hour before you are ready to serve, prepare the collards by cutting the leaves into strips and add them to the stew.
  5. Add the reserved cooked bacon at this time. Cook the stew for another 40-60 minutes.
  6. Remove the bay leaves, thyme stems, and jalapeno halves.
  7. Serve alone or over of your favorite rice. If desired, can top with cheddar cheese, scallions and a drizzle of white vinegar.

Top ↑

Cornish Game Hens


I decided to go a little non-traditional this Thanksgiving, and make cornish hens instead of turkey. I’ve never made them before, and am so glad I did… they were truly incredible. Seriously. I combined two recipes, one was for a turkey breast, and have to say, it’s a brilliant combo. I will tell you there are a lot of ingredients, but don’t shy away because of that… there’s a rub for the bird, in addition to what’s put in the cavity, so it’s really pretty straight forward. I’m giving you the recipe to make two hens, so if you just want to make one, simply divide everything in half.

Cornish Game Hens

Ingredients

For The Cavity

  • 4 cloves garlic (2 for each hen) + 8 additional cloves garlic for arranging around hens
  • 2 cinnamon sticks (1 per hen)
  • 1 small onion, cut in half (1/2 onion per hen)
  • 4 lemon wedges (2 per hen)
  • 2 sprigs rosemary (1 per hen)

Herb Rub Mix

  • 1/4 cup olive oil
  • 2 cloves garlic, minced
  • Zest of 1 lemon
  • 2 tbsp. fresh rosemary, finely chopped
  • 2 tbsp. fresh sage, finely chopped
  • 2 tbsp. fresh thyme, finely chopped
  • 2 tbsp. fresh parsley, finely chopped
  • 1 tsp. chili powder

For Basting

  • 1/3 cup white wine
  • 1/3 cup chicken broth
  • 2 tbsp. olive oil

Directions

  1. Preheat oven to 450 degrees F.
  2. Season hens with salt and pepper.
  3. Stuff hens with cavity ingredients.
  4. Generously rub herb mix all over hens and underneath skin.
  5. Arrange 8 garlic cloves around hens in small roasting pan (you don’t need a rack).
  6. Add some chicken broth to pan. I didn’t measure but made sure the bottom of pan was covered.
  7. Roast in oven for 25 minutes.
  8. Combine wine, chicken broth and olive oil in a bowl.
  9. Reduce temperature to 350 degrees F. and pour basting liquid over hens.
  10. Baste every 10 minutes, and continue roasting for 25 minutes longer, or until hens are golden brown and juices run clear.

* To make a gravy/sauce, transfer pan juices and garlic cloves to a saucepan, and boil until liquid reduces to a sauce consistency, about 8 minutes. 

Top ↑

Braided Spaghetti Bread


I loooooove bread and pasta, however, I try to keep my carb intake to a reasonable level. But, when I saw a picture of this recipe on Pinterest, I knew I had to try it. The original recipe calls for using frozen bread loaf dough, which I found to be a little difficult (aka sticky) to work with, so alternatively, you could use Pillsbury Crescent Dough Sheets to make it easier and much quicker (and cut down on the carbs a bit). With that being said, after I got the dough loaf thawed (which takes about 2 hours) and rolled out, everything else was a breeze. The end result was a delicious garlic bread filled with spaghetti and mozzarella cheese! So if you’re a carb-lover, you will truly enjoy this recipe.

There are a ton of other things you could do with this if you want to skip the spaghetti… pizza, reuben sandwiches, chili-cheese bread, etc.

Ingredients

  • 1 loaf bread dough, thawed to room temperature, about 2 hours (I used Bridgford, but the original recipe calls for Rhodes)
  • 6 oz spaghetti, cooked (I used thin spaghetti)
  • 1 1/2 cups thick spaghetti sauce, like Trader Giotto’s (Joe’s) Tomato Basil Marinara
  • 8 oz mozzarella cheese, cut into 1/2″ cubes
  • 1 egg white
  • Parmesan cheese
  • Garlic powder
  • Parsley flakes for garnish

Directions

1.  Thaw bread loaf to room temperature.
2.  Preheat oven to 350 degrees F.
3.  Place loaf on parchment paper (not wax), and spray rolling-pin with cooking spray.
4.  Roll  into an approximate 12×16-inch rectangle.

5.  Cover with plastic wrap, let sit 10-15 minutes, then roll again.
6.  Cook spaghetti according to package directions. Drain, cool slightly and mix with marina sauce.
7.  Place spaghetti lengthwise in a 4″ strip down the center of the dough and add the cheese cubes.

I added sweet Italian turkey sausage and sautéed onions to the sauce.

8.  Make cuts 1 1/2-inches apart on long sides of dough to within 1/2-inch of filling (as seen in picture above).
9.  Begin braid by folding top and bottom strips toward filling. Then braid strips left over right, right over left. Finish by pulling last strip over and tucking under braid.

10.  Brush with egg white, and sprinkle with Parmesan cheese, garlic powder and parsley, as liberally as you like.

11.  Transfer parchment paper to baking sheet and cook for 30-35 minutes.

12.  Cool slightly and slice to serve.

Top ↑

Pistachio-Crusted Chicken with Herbs (and Mustard Cream Sauce)


I came across this recipe a while ago, and bookmarked it to try another time. I was at the store over the weekend, and saw a bag of pistachios, which immediately brought my memory back to this dish. However, I highly recommend you buy pistachios already shelled as it took me a bit of time to crack open each pistachio to get a cup worth’s of nuts. And that way… you won’t get disappointed when you come across those shells that are not cracked at all and can’t be opened. Another recommendation I have is to butterfly/split/cut the chicken breasts in half, or you could use chicken tenders. I find the chicken is more tender when they’re a little thinner, and quite frankly, I just prefer them that way. In a nutshell (no pun intended), I found the combination of the herb mustard mixture combined with the pistachio-panko crust was simply divine! Oh, and when paired with the mustard cream sauce… WOW!!!

Ingredients

  • 1 cup shelled raw pistachios (about 4 ounces)
  • 1/2 cup Panko (Japanese breadcrumbs)
  • 4 tbsp. Dijon mustard
  • 2 tbsp. light mayonnaise
  • 1 tbsp. honey
  • 2 tbsp. chopped fresh basil (or 2 tsp. dried)
  • 1 tbsp. chopped fresh dill (or 1 tsp. dried)
  • 1 tsp. chopped fresh rosemary (or 1/2 tsp. dried)
  • 4 skinless boneless chicken breast halves, butterflied
  • Mustard cream sauce

Directions

  1. Preheat oven to 350°F.
  2. Finely grind nuts in processor. Add Panko and blend, using on/off turns.
  3. Transfer to shallow baking dish or bowl.
  4. Mix mustard, mayo, honey, basil, dill and rosemary in medium bowl.
  5. Spread mustard mixture over both sides of each chicken breast.
  6. Dip chicken breasts into nut mixture, coating completely. Sprinkle with salt and pepper.
  7. Transfer chicken to baking sheet.
  8. Bake chicken until cooked through, about 25 minutes.
  9. Spoon Mustard-Cream Sauce over chicken and serve immediately.

Source: Adapted from Bon Appétit

Top ↑

A Modified Version of Shrimp and Grits


As you may, or may not know, I looooooooove shrimp and grits! While my earlier recipe on here is one of my all-time favorites, this one is simply delicious. I was watching The Chew on Friday, and Carla Hall made a dish called “Swamp Thing”, which was her healthier version of shrimp and grits. Once I saw it was loaded with vegetables, I was sold, and knew I had to try it, which I did later that day with a few small modifications. This recipe does take a little effort, as the grits need to be made about an hour beforehand, and there’s a decent amount of veggie chopping, but trust me when I say, it’s worth it! Thanks Carla!!!

Ingredients

Grits:

  • 1 cup Quick Grits
  • 1 1/2 cups water
  • 1 cup Half & Half (or milk)
  • 1/2 cup fresh or frozen corn
  • 1/2 cup cheddar cheese (optional)
  • salt & pepper to taste
  • 4 tbsp. butter
  • Olive oil (for frying grits)

Shrimp Stew

  • 1/2 pound shrimp (peeled and deveined)
  • 3 cloves garlic (thinly sliced)
  • 1/2 onion (medium diced)
  • 1 large carrot (medium diced)
  • 1/4 cup corn
  • Half of a 14.5-ounce can whole plum tomatoes (crushed)
  • 2 cups collard greens (ribboned*)
  • 1 cup sweet potatoes (peeled and diced, or canned)
  • 1/4 tsp. cayenne pepper
  • 1/2 parsnip (peeled and diced)
  • 1 bay leaf
  • 2 tsp. fresh thyme
  • 2 tbsp. flour
  • 1 quart (4 cups) chicken stock/broth
  • 2 tbsp. olive oil plus more for pan
  • salt and pepper to taste

Directions

Grits

  1. In a medium saucepan, bring water, Half & Half, and corn to a boil.
  2. Slowly whisk in grits, avoiding lumps and cook according to package directions.
  3. Once cooked, whisk in butter and cheese (if using).
  4. Pour into greased baking dish, allow to cool, then place in refrigerator for an hour.
  5. At this point, you can start on the stew if you want & come back to step 6.
  6. Remove grits from fridge and cut into 3 inch squares (or desired size).
  7. Heat a non-stick pan over medium-high heat with olive oil.  Fry grits in hot oil until golden on all sides. Remove from pan.

Shrimp Stew

  1. In a heavy bottomed pot, over high heat, add olive oil. Toss in the onions and garlic and cook for about 3 minutes.
  2. Toss in all the other vegetables except for the collard greens and crushed tomatoes, and add olive oil if it seems dry. Coat all the vegetables in oil and continue to cook over high heat, just slightly browning everything.
  3. Sprinkle flour over the vegetables and stir. Deglaze with the chicken stock. Add the collard greens, thyme, bay leaf and cayenne, and stir.
  4. Add in the tomatoes and bring to a boil.
  5. Reduce to a simmer and cook until the vegetables are cooked through, about 25 minutes.
  6. Right before serving, toss in the shrimp and simmer for 2-3 minutes, or until the shrimp is just cooked through.
  7. Plate in a soup bowl on top of fried grits.  Season to taste.  Serve immediately.

* To ribbon the collard greens, take some leaves, place them on top of each other, roll them up long-way, and cut small pieces off of the ends. This will form long, thin pieces known as ribbons.

Note: If you don’t do shrimp/shellfish, you can definitely leave it out. Also, feel free to substitute vegetable broth in place of chicken broth. 

Top ↑

Roasted Pomegranate Molasses Chicken


I made this scrumptious dish about two weeks ago, and in my personal opinion, it is the bomb-diggity. The flavors marry so incredibly well together, which results in enormous flavor, and roasting the chicken makes it super moist. Pomegranate molasses and tamarind paste may be difficult to find in a “regular” grocery store, so I’d recommend going to Whole Foods, where they can be found near the Thai products. The wonderful thing about this recipe is that it only has four ingredients (besides the chicken) and requires marinating for just a couple of hours. The original recipe calls for whole chickens, however, I decided to use legs quarters, but chicken breasts, tenders, or thighs could be substituted.


Ingredients

  • 1/4 cup Pomegranate molasses
  • 2 1/2 tbsp. apricot preserves
  • 1/4 cup orange juice, preferably fresh-squeezed (I used Tropicana Pure Premium)
  • 1 tbsp. tamarind paste, thinned with 1/2 tbsp. water
  • 2 chicken leg quarters

Directions

  1. Preheat oven to 400 degrees.
  2. Combine the molasses, preserves, orange juice, and tamarind in a medium bowl.  Whisk to combine.
  3. Place the leg quarters in a sealable plastic bag, add the marinade to bag, seal the bag, and massage chicken to distribute the marinade all over chicken.
  4. Let chicken sit for two hours refrigerated.
  5. Take chicken out of the refrigerator, remove from bag, and place in a roasting pan.  Toss bag with marinade in trash.
  6. Place roasting pan in the preheated oven and roast chicken for about 45 minutes or until dark golden brown, with juices running clear.
  7. Remove chicken from oven and serve while hot.

Top ↑

Italian Barbecued Chicken (with Polenta)


In my recent polenta post, I mentioned that I came across a BBQ chicken recipe from Rachael Ray which I intended on making soon, and decided to try it out last night. I made a few modifications like I normally do, and all I can say is… WOW! The sauce is truly delectable and really makes the dish. I took some to work today, and finished every single last bite! So if you like chicken, and want a delicious new way to make it, I highly suggest you try this recipe.

Ingredients

  • 4 bone-in chicken thigh and leg or chicken breasts 
  • Salt and freshly ground black pepper
  • 2 tsp. poultry seasoning
  • 2 tsp. grill seasoning
  • 3 tbsp. extra-virgin olive oil
  • 4 thick cut slices pancetta or bacon, chopped (optional)
  • 1 medium sweet onion, finely chopped
  • 2 cloves garlic, minced
  • 1 to 2 sprigs fresh rosemary, finely chopped
  • 1/4 cup balsamic vinegar 
  • 3 tbsp. brown sugar
  • 1 tbsp. Worcestershire sauce  
  • 1 cup tomato sauce 
  • 1/2 cup chicken stock
  • Torn fresh basil leaves
  • Polenta

Directions

  1. Preheat oven to 400°F.
  2. Season the chicken liberally with salt and pepper, poultry seasoning, and grill seasoning.
  3. Heat 2 tablespoons olive oil in a medium skillet and brown the chicken a few minutes on each side to put some of its flavor and drippings into the pan, then transfer to oven and roast 10 minutes more.
  4. Meanwhile, if using pancetta or bacon, add to pan, and cook until crisp. Remove from pan, crumble and set aside.
  5. If not using the meat, put one more tablespoon olive oil into pan, and add onions, garlic and rosemary. Cook 5 minutes, then add the vinegar, sugar, Worcestershire, tomato sauce and 1/2 cup chicken stock or broth.
  6. Reduce heat to low and let sauce simmer 5 minutes more.
  7. Remove chicken from oven, place in barbecue sauce, add bacon or pancetta (if using) and cook for an additional 5 minutes.
  8. Fill shallow bowls with polenta, top with chicken, spoon extra sauce over chicken and garnish with some torn basil leaves.

Top ↑